Deploying Kafka in Production: From Zero to Hero (Part 1)
Learn how to spin up a single-node Apache Kafka with Docker, forming the solid foundation for a robust message bus on GCP. This post covers minimal configurations, basic ZooKeeper setup, and real-time streaming, setting the stage for advanced security and scalability.


Kafka in Production - We are Building a Scalable, Secure, and Enterprise Ready Message Bus on Google Cloud Platform
opensight.ch - roman hüsler
Table of Contents
- Part 1 - Kafka Single Instance with Docker
- Part 2 - Kafka Single Instance with Authentication (SASL)
- Part 3 - Kafka Cluster with TLS Authentication and ACLs
- Part 4 - Enterprise Authentication and Access Control (OAuth 2.0)
- Part 5 - Google Cloud Production Kafka Cluster with Strimzi
- Part 6 - Kafka Strimzi Observability and Data Governance (upcoming)
TL;DR
Although I recommend reading the blog posts, I know some folks skip straight to the “source of truth”—the code. It’s like deploying on a Friday without testing.
So, here you go:
Introduction
Apache Kafka is a powerful event streaming platform, but running it in production is a different challenge altogether. We will start with the basics, but this is not a playground—we work our way towards building an enterprise-grade message bus that delivers high availability, security, and scalability for real-world workloads.
I'm not a Kafka specialist myself—I learn on the go. As is often the case with opensight blogs, you can join me on my journey from zero to hero.
In this blog series, we will take Kafka beyond the basics. We will design a production-ready Kafka cluster deployment that is:
- Scalable – Able to handle increasing load without performance bottlenecks.
- Secure – Enforcing authentication (Plain, SCRAM, OAUTH), authorization (ACL, OAUTH), and encryption (TLS).
- Well-structured – Including Schema Registry for proper data governance.
- Enterprise-ready – Implementing features critical for an event-driven architecture in a large-scale environment.
From deployment strategies to tuning, monitoring, and best practices, we will cover everything needed to run Kafka in production the right way. Let’s build a message backbone that is built to last.
We start with a single instance deployment on a docker vm and work our way to a full scale deployment on Google Kubernetes Engine (GKE). So we will start with the fundamentals and progressively incorporate scalability, security, and enterprise-grade capabilities. While the details may evolve, this structured approach ensures a solid foundation and a clear path toward a robust Kafka infrastructure.
Technologies, Knowledge Prerequisites
In this series, we’ll focus on deploying a production-ready Kafka infrastructure rather than revisiting Kafka fundamentals. To get the most out of this guide, you should have a solid understanding of the following technologies:
- Linux – Basic system administration and command-line proficiency
- Kafka – Core concepts like topics, partitions, producers, consumers, and brokers
- Docker – Containerization and running Kafka within containers
- Terraform / OpenTofu – Infrastructure as Code (IaC) for automating deployments
- Kubernetes – Orchestrating Kafka clusters in a cloud-native environment
- Google Cloud Platform (GCP) – Deploying and managing resources on GCP
If you're comfortable with these technologies, you're ready to dive in!
Part 1 - Kafka Single Instance with Docker
We start with deployment of a single instance Kafa on a Docker VM.
Prerequisites:
For this setup, I have provisioned a test virtual machine (VM) on Google Cloud Platform (GCP) using an Ubuntu Linux (n1-standard-2) instance with 2 vCPUs and 8GB of memory. However, you don’t need to use GCP specifically—any Ubuntu-based VM with Docker installed will work just fine.
Overview
To get started, we will deploy a single-instance Kafka broker along with a single-instance ZooKeeper on our Docker host. At this stage, we will not configure encryption or authentication—our primary goal is to establish a minimal, functional Kafka setup as a foundation for more advanced configurations in future steps.
All deployment files can be found on github
Since launching this blog, I came across KIP-500: Replace ZooKeeper with a Self-Managed Metadata Quorum, which aims to eliminate the dependency on ZooKeeper in Apache Kafka. This is an important development, and we will cover it in more detail in a future post.
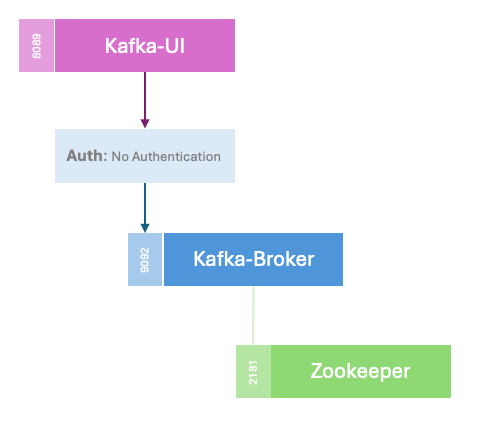
listeners: PLAINTEXT://0.0.0.0:9092
Kafka will listen on all network interfaces in plaintext mode. So no authentication and no encryption. The option listeners defines where the Kafka broker listens for incoming connections, whereas advertised.listeners defines how Kafka advertises itself to clients (producers/consumers).
For now, I’ve decided to use the cp-kafka Docker image, as it offers a straightforward setup and quick deployment. Configuration is simple, as key options—such as advertised.listeners—can be set via environment variables like KAFKA_ADVERTISED_LISTENERS. These values are automatically injected into the Kafka configuration file by the image during startup, streamlining the setup process.
version: "3.8"

services:
  zookeeper:
    image: "${ZOOKEEPER_IMAGE}"
    container_name: zookeeper
    environment:
      ZOOKEEPER_CLIENT_PORT: 2181
      ZOOKEEPER_TICK_TIME: 2000
    ports:
      - 2181:2181
    networks:
      - kafka

  kafka:
    image: "${KAFKA_IMAGE}"
    container_name: kafka
    depends_on:
      - zookeeper
    environment:
      KAFKA_BROKER_ID: 1
      KAFKA_ZOOKEEPER_CONNECT: zookeeper:2181
      KAFKA_LISTENER_SECURITY_PROTOCOL_MAP: PLAINTEXT:PLAINTEXT,PLAINTEXT_HOST:PLAINTEXT
      KAFKA_INTER_BROKER_LISTENER_NAME: PLAINTEXT
      KAFKA_LISTENERS: PLAINTEXT://0.0.0.0:9092
      KAFKA_ADVERTISED_LISTENERS: PLAINTEXT://kafka:9092
      KAFKA_AUTO_CREATE_TOPICS_ENABLE: "true"
      KAFKA_OFFSETS_TOPIC_REPLICATION_FACTOR: 1
      KAFKA_TRANSACTION_STATE_LOG_MIN_ISR: 1
      KAFKA_TRANSACTION_STATE_LOG_REPLICATION_FACTOR: 1
      KAFKA_GROUP_INITIAL_REBALANCE_DELAY_MS: 100
    ports:
      - 9092:9092
    networks:
      - kafka

  kafka-ui:
    image: "${KAFKA_UI_IMAGE}"
    container_name: kafka-ui
    depends_on:
      - kafka
    environment:
      KAFKA_CLUSTERS_0_NAME: local
      KAFKA_CLUSTERS_0_BOOTSTRAPSERVERS: kafka:9092
    ports:
      - 8089:8080
    networks:
      - kafka

networks:
  kafka:
    driver: bridge
Now, let’s provision our first Kafka deployment. I also have written a little test program in NextJS, which I can use to test this kafka deployment and further deployments. It can publish a message on the bus (left side) and receive on the message (right). The simple kafka deployment seems to work perfectly.
docker compose up -ddelpoy kafka on docker host
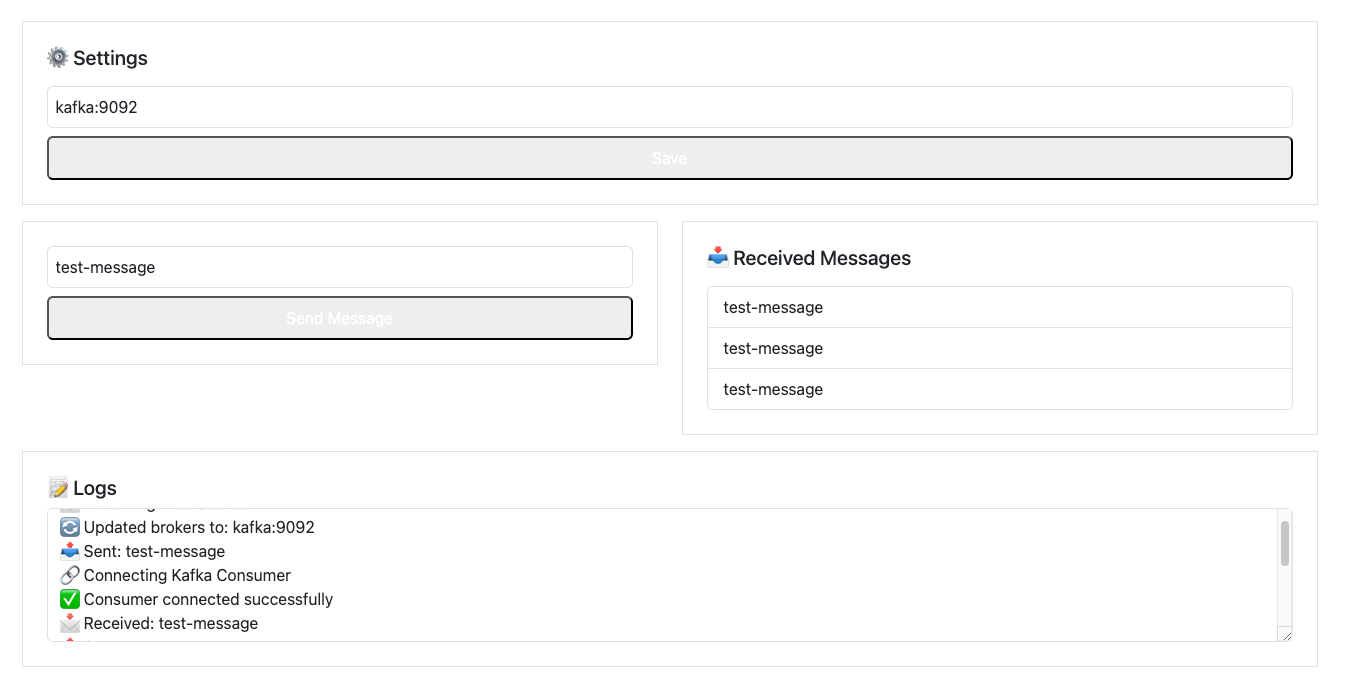
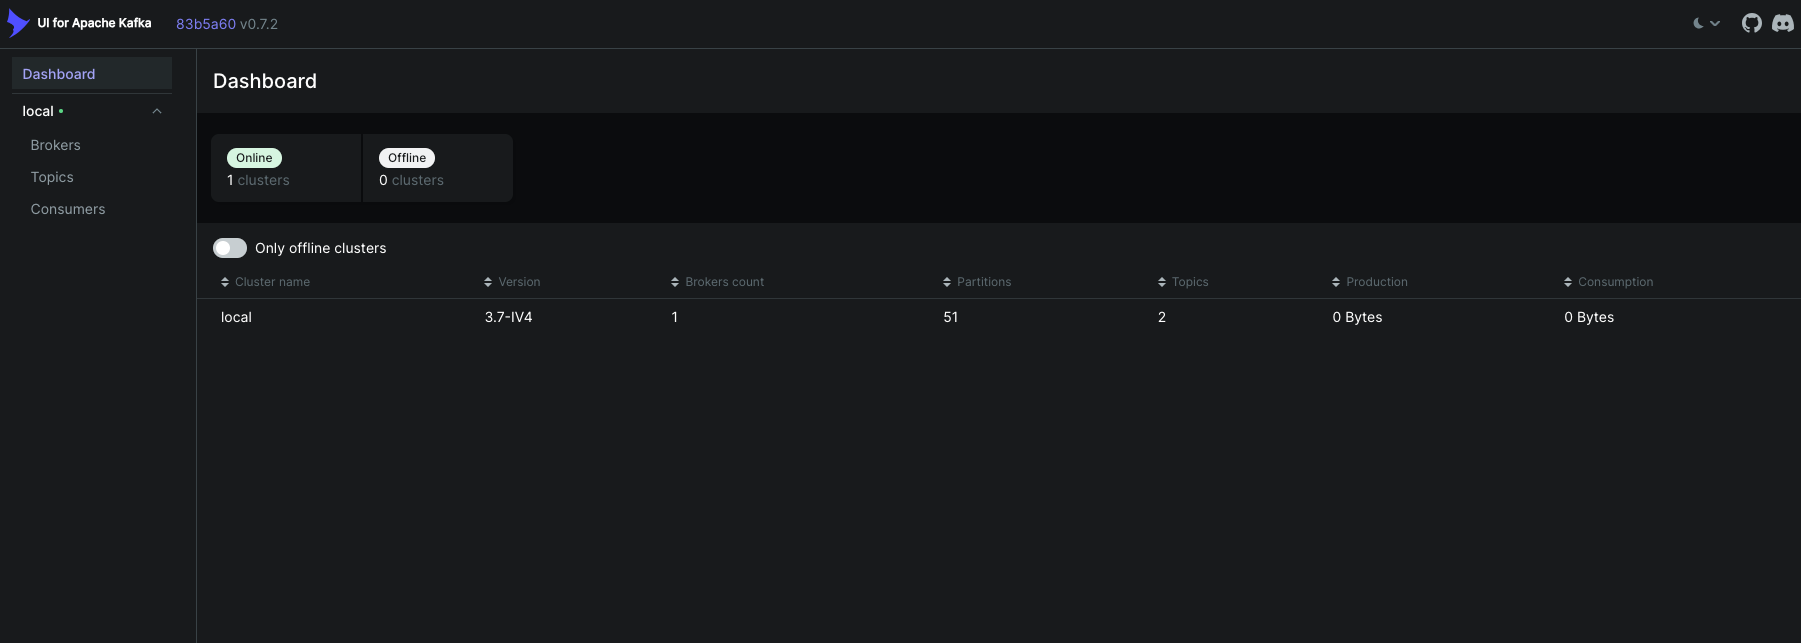
The Kafka UI is accessible on the host machine via port 8089. At this stage, I recommend exploring the Kafka UI to get familiar with its features. Try creating topics, publishing messages, and observing how Kafka handles them in real-time. This hands-on approach will help you better understand Kafka's functionality. 🚀
Once you're done experimenting, you can tear down the Kafka deployment using the Makefile or directly with a Docker Compose command. This ensures a clean removal of all related containers and volumes.
docker compose down

or

make clean
destroy kafka deployment
That wraps up the first part of this blog series. In the next installment, we'll continue with a single-instance deployment but introduce SASL (Simple Authentication and Security Layer) for authentication. Stay tuned!